Showing posts with label building. Show all posts

Saturday, December 03, 2011

this and that in smojos cigar box guitar world

It's been a bit of a frustrating time here and an exciting one too. Still a bit quiet on my CBG front. Much as I love 'em, there are many other interesting distractions going on in my life. First the frustrations - I bought some cool looking lipstick pups, cheap, with the intention of building myself a super duper CBG with frets and a proper magnetic pickup. Got as far as cutting the neck from a piece of old shelving when my bandsaw blade snapped. So that one went on on hold.

As you will have noticed, I've been heavily into the electronics side of things. Not a million miles away from the cigar box guitar ethos of making something cool and musical out of junk or stuff that was never meant for that purpose. So I started "bending" an old casio keyboard. Found a cool distortion bend, drilled holes and mounted the switch and two pots. Working one minute - the next it was just making a horrid buzz. Messed about but can't seem to fix it. Maybe I burnt out something. So that's on hold too. Moved on to a new electronics project - making an envelope follower from the Nic Collins book. You can connect a sound source like a guitar or CD player and it's supposed to light some LEDs when the signal peaks or dips. Got the preamp part made but can I get the LEDs to come on when they should? - no, on hold too.

So what are the exciting bits. Well I had an great weekend in Manchester with my mate who had organised the Hollowbelly gig at his local pub. Great atmosphere and the whole thing went down well. Hollowbelly belted out his excellent punk blues material whilst entertaining us with some funny stories in between. The support act was great too, three local people who got together with slide guitar (and CBG), african drum and cigar box bass to play some nice bluesy stuff. Lot's of time to chat about music stuff and do a bit of jamming back at my mates too.

I bought an old ex-forces bakelite communicator set which is a chest mounted microphone and headphones. I was looking for an old telephone receiver to make a distortion mic and I found this. Might be ww2 but if not, will probably be at least 50 years old. I dismantled the set to make three mics, the chest mic I'll keep for myself, the two headphone mics I might eventually sell on. They look so cool and make fantastic hand held mics for vocals or harp where you want a bit of an old-timey, mildly distorted sound. If I get time I'll post a photo or two.

Finally (please forgive me but let me explain) I'm about to build a solid body electric 6 string guitar. As I said I do love CBGs but I suffer from GAS (guitar acquisition syndrome) where I have to keep getting a fix with a new guitar. I see something cool and I want it! Yes my friends you know what I mean. The explanation will justify the diversion from 3 strings, a stick and a box guitar. For some time I've wanted the personal satisfaction of building a "proper" guitar. Something really cool and unusual. Also to take my luthier skills a little higher and get to grips with the more complex elements of guitar building. There's a local guy who runs courses on guitar building on a one-to-one basis. I went to see him this week to talk about starting with him. My initial idea was to make something based on the old guyatone solids of the 50s/60s. They look so cool with their simple retro shape and colours. But I do have a really nice Harmony Stratotone reissue that fits the bill so what to build instead? Then the bulb lit up in my head. A solid body reso similar to the National supro reso guitars. A bit of research showed that they make a modern version still. So my design will be based on that but with a bit of the guyatone look about it. It will have an under-saddle piezo and a single coil neck pickup. I've done a very rough photoshop job to get some idea of what it might look like and here it is. I'm starting the build this wednesday. We're going off to a timber yard to chosse the wood and then back to cut it up and glue the two body halves - can't wait! I'm gonna keep a record of my progress and put something on here so if you're interested, come back and take a look regularly. It might just get me inspired enough to get cracking with my lipstick pick-upped CBG too.


Friday, July 16, 2010

can't believe it's July already

Just looked at my last post - May and now we're half way through July! I know I've been inactive on the cigar box stuff but didn't realise how long for. Summer is here and for a change, here in England, we have been having a hot and sunny one. I seem to have deserted the cool, dark, dusty, basement workshop for the bright, warm sunshine - vacations, afternoon beers, walks in the park - you know all that boring stuff you need to do in summer. I do find that creativity comes and goes in cycles. I get really hyped up over something, then like a fire, it starts to burn lower and if you're not careful, it dies out. Well this cbg stuff seems to keep glowing like an ember. I just need to feed it a little and it bursts into flames again.

I've been plodding along with a CB uke for weeks. Because it's a new direction, it is taking a lot of time and thinking about. I'm not really enthusiastic about it but it's on order and I need to get it built. So I forced myself out of the apathy (mainly because it's rainy now) and into the workshop. The build is progressing nicely. Just fitted the frets (not my favourite job) but necessary for a uke. The neck is looking great. I need to file the fret ends smoothe and treat the neck - probably just oil it. Trying to decide on a finish for the headstock. I like to reflect the colour or design of the body on the headstock in some way. It just seems to make the design "gel".Another new direction in this build will be the bridge. I'm gonna try make a traditional uke style bridge. There's not so much leeway for individuality on a uke than there is on a three-string CBG. Mainly because there are certain elements that must be present, like fret wires and the fact that the nylon strings don't transmit the vibrations as well as steel. So I don't think you can get away with rusty bolts for bridges and nuts like you can on a CBG. I'll post some photos soon. Until then, enjoy the summer whilst it's here.

Wednesday, May 12, 2010

building cigar box guitars again

Well I've broken the spell that was keeping me from making guitars. I just needed to completed some other unfinished projects and have a crack at some recording. I've done enough of both now to satisfy that lust for a while and feel I needed to make some more guitars. I'm building two simultaneously. Neither will be meant to be keepers - but I've said that before and had to eat my words! I'm using my last green Ramone Allones box for one guitar, these are my favourites in terms of making pretty looking guitars. The other box is a Don Thomas one. Nothing radically new about either design but I'm using my aged paint look on the necks with burnt in fret markers. I think they'll both be pretty guitars when finished. I have thought about trying to age some of these paper covered boxes but am reluctant to try in case I just make a mess of them. I think I prefer to let them age naturally by the owners. After a year or two they will blend down nicely with the other ageing I have done to the necks.

Talking about recording, I had a fun time messing with my new gear. Mainly using the Akai Headrush, my Zoom 505 effects pedal then recording it in simple mono on the Backtrack device. It works well - nice and simple. The backtrack records everything you play as seperate WAV files, so you can drag them onto your PC, import them into your editing software and produce a track quite easily. I found that whilst simply "messing about", a musical idea would start to take shape and with a bit more practise and fine tweaking, I can produce something quite listenable (I think). I now have a loose plan to collect these odd tracks together and eventually put them together as an album. Maybe not for general consumption, but mainly just as an interesting project to work on with a tangible product at the end of it. I'd urge any of you players to have a go at something similar yourelves. It's fun and it tightens up your playing and helps get you out of those ruts we tend to get stuck in when just playing on our own.

Friday, March 26, 2010

the creative process is like magic

I've now put a video on Youtube showing the new CBG together with the case and an amp I made from an old radio extension speaker. You can here it and me waffling about it here.
http://www.youtube.com/watch?v=EGoVjBD1VTk

I'm going to waffle a bit more about it here. What I want to discuss is how enjoyable it has been making this guitar and the case that I made a few weeks ago, which will house it. It has taken me to a new level of creativity that I haven't found before. Now you might think I'm getting a bit weird here but the fact that you are here reading about these things, means we have a certain weirdness in common so I'm forgiven! You see I decided they were going to be special in some way. They were always going to be keepers so I was prepared to take however long it took to get there. I always put some original element into each guitar I make, but to some extent, the main construction usually follows a certain loose formula. There was no formula here. There were several new learning curves to overcome - fitting frets, a magnetic coil pickup making the box etc. I ruined one neck to start with, which was a stupid mistake because I hadn't thought it through properly. So that's when I decided to take my time and get it right and build a guitar I would cherish for a long time. Having decided there was no rush to finish them, I could allow myself the luxury of time and letting my ideas ferment a while, before committing them to the build. The effect of that was to allow me to savour the creative process. A bit like enjoying a special meal, not just eating it to satisfy hunger, but taking your time and enjoying every mouthful. The luxury of not rushing it meant I was happy to experiment a bit first and if something didn't look quite right, I could try something else until I was happy.

Now this is where it gets even weirder. I have a sort of theory, that if you use a bit of sensitivity in the creative process and add the ingredient of time, so that things can materielise, the desired object (guitar, case or whatever you're making) will take form by itself to a large degree. You will need to help it along with your craft skills, but it will gather momentum and attract things to itself (I warned you it was getting weird.) Let me explain how this process panned out with this guitar. I found the cigar box at a car boot sale. It was quite old and nicely aged. Inside it were a pair of dice and a plastic toy Skeletor. I had a loose idea of what I wanted - an understated, aged looking, rat-rod guitar with frets.

So that determined the general feel of how it should look but not much to go on there. Let's see how it develops. Now to start creating. This is where your sensitivity, imagination and an eye for what looks good, pay dividends. The first element to find it's way to the guitar was the magentic pick-up. I was incredibly fortunate to win a hand-wired pick-up that JuJu had made when I attended the Birmingham CBG fest. That was definitely going to go in this guitar which determined how the neck needed to be built. A hefty reinforcing piece inside the box to facilitate cutting a big chunk out to house the pick-up. I built the neck and thought about how to finish it. The aged look of the box "told" me, the neck needed to look aged too, so needed some woodstain. I experimented with a few shades and found one that I thought looked good with the colour of the box, a dark stain that rubs back nicely to look like it's worn. I found a cool piece of rusty metal plate in my uncle's garage. Painted white with rust bursting through, it had a number of holes drilled in it. The shape reminded me of the chrome control plate on a Telecaster. Bingo, that's what I'll do with that. I had an old starter module from a flourescent light fitting. I liked the knurled edge and simple shape of it and being white, I thought it would make a nice volume knob to go with the white rusty plate. I cut it in half and glued it over an old knob so it would fit the spindle of the potentiometer. One of the holes in the plate could be enlarged to house the jack socket. I decided a white headstock would go well with the white plate and knob but the aged look of the box "suggested" I should give it an aged look too. I used some crackle finish liquid on the front of it then painted it with white emulsion. See how the metal plate is partly determining the way the other components will look. A little brown boot polish yellowed the white paint and some judicial sanding made it look worn-in. The minimal look I aspired to told me I shouldn't go overboard on the fret markers, so I opted for tiny triangles of white in the corners of the frets. An old rusty hinge from my box of bits made a tailpiece for the strings, it. The bone slide I bought from Randy came with some nut blanks. I figured as this was going to be a special guitar, I'd use them to make the nuts and saddle. That determined the bridge which needed to be wood to hold the bone. I had an idea I wanted an old, well-worn but thin, leather strap. I found two old dog leashes on a car boot sale, perfect for the job. A little modification to the ends and I have a cool, clip-on strap. The sound holes - now there's a story there but I'm keeping that one a mystery! Finally I had the idea of using the dice and skeletor as part of the guitar. I sliced off one side of one dice with the intention of inlaying it into the fretboard for the 12th fret. I tried it in place but it spoilt the minimal look of the fretboard so what else could I do with it? Make a tiny pick. What about Skeletor? Too big, new looking and colourful to use but what about cutting his tiny head off, which then looked like a small jewel and planting it somewhere? I found the perfect place, just nestling behind the nut on the headstock. The headstock was square-ended to begin with but the rounded shape of the pick-up and switchplate suggested a rounded end would look better, so I cut it round too.

There we have it. Can you see how time and a sensitivity to the design and the components you have, will sort of tell you what needs to be done and how it kind of shapes the final look? And if you allow yourself this luxury, you'll get immense pleasure from your creation. I am always surprised at the end of a build, to some degree, as to how a guitar turns out. It's almost like looking at it for the first time. Until it's strung up and I've played it, it's just a bunch of parts, but then hey presto, as if by magic, it becomes an entity of it's own. It's like a butterfly emerging from a coccoon.

See I told you I was weird! Weird is great - embrace your weirdness and get creating something that will be entirely unique, incredibly personal and totally enjoyable.

Tuesday, March 02, 2010

some cbg photos as promised

I made an effort and took some photos to show you as promised. This is the "special" I've been working on for a while. It may not look much but my design aims were to make a visually understated guitar, quite minimal looking and a bit of a "ratrod". Having made a plain, aged-wood finish guitar before, and liked the look of the monochrome brown, I decided to make another but with some added refinements. The hand-wound magnetic pickup I won at the Birmingham CBG fest is the first refinement that makes it a special. Adding a second pup in the form of a piezo disc and a changeover switch plus volume control were the next additions. And to top it off, I've got some real bone blanks for the nut and saddle. Check out my posting on the bone slide to read about these.

Monday, July 27, 2009

two new CBGs finished


Just finished the two new ones. Top is the Monte. I've used the tangs of a fork, cut off from it's handle and bent back through 180 degrees as a string anchor. Works well. Neck has had white paint rubbed into the grain to give it a limed oak effect. Frets marks were cut in and filled with paint then red paint rubbed into the main fret positions. I didn't like the smoking warning on the label so rubbed most of it off with wire wool then added my own smojo stamp three times to make it more interesting. Sound holesurrounds are brass grommets. It's tuned to low open E. Sounds and plays great.

Bottom one is a Romeo Y Juliet. Similar treatment on the neck but I stamped my thumbprint in green paint on the main fret psotiotions. I've used a piece of wire mesh glued inside the soundhole which is slighty bigger than I usually make them. It has a fantastic acoustic volume for a small box. Maybe the bigger hole helps. This one is tuned to open A. They both have piezo pups and sound great.

Thursday, March 26, 2009

New cigar box guitars

Just started two new builds. One is going to be my first 4 stringer and it's going to have frets which will be a first as well. The box for it is a beautiful Indian Tabac Cigar Co. This one's going to be a keeper so I'm going to town on it a bit. I've rounded the back of neck for comfort and experimenting with creating a cracked paint finish to cover it with. I will definitley add a volume pot and might invest in a magnetic coil pup (another first). It's good to break the mould and try something different.

The other box will be for sale and is a three stringer. Mahogany neck again (I got several solid shelves from the local Freecycle). I've cut grooves for fret markers and filled them with white undercoat. The marker dots have been routed in and also filled with white paint. Not sure what else I'll put on it yet, maybe a drain cover for soundhole or maybe something completely different. I'm in the mood for innovation.

Had a go at making a stomp box too. The sound from the piezo I fitted was disappointing though - too harsh, so i need to experiment some more. Cushioning with a piece of carpet on top improves it and so does using a shoeless foot for stomping.

Nice to see we're getting a few Brits over on Cigar Box Nation. I started a discussion just for us, so if you're a Brit and into CBGs why not sign up and meet the other guys.

http://www.cigarboxnation.com/group/thebritsarecoming

Friday, February 27, 2009

cigar box guitar soundholes

Had an interesting question from a reader and after spending a while replying, thought it would make a good post for others. Norm asked:

I've cut the neck for a 6 string acoustic CBG to learn on. Have a beautiful piece of leopard wood for the fret board. Trying to select the box. Going to go with kind of a plain Jane so I won't feel bad about cutting a sound hole in the middle. Since some of the art work on the CB's I have picked up is so beautiful I can't bring myself to put a big hole through it!!!

My question is this. I'm going with a 25 inch scale, how large of a diameter sound hole should I cut and how far from the bridge do you think I should place it. I'd like to get the biggest sound as possible. Would you suggest reinforcing the inside of the box? I am building with the neck and tailpiece as one unit going all the way through the box.... hmmm that right there would limit placement of a central sound hole. What would you suggest with that in mine? Maybe two smaller sound holes on each side of the neck/tail piece? If so what size diameter or radius?


Answer

There's been a lot of debate on CBG forums about soundhole sizes. I'm not an expert luthier, I reckon you probably know more than me on regular guitar building. I tend to like to keep things fairly quick and simple in the original spirit of CBGs being rough home-made instruments. I do like to know the science etc behind things though but don't actually apply it to my builds. Here's a link to one article http://hal9000.ps.uci.edu/Weber%20H90%20Physics%20Paper.pdf just Google "helmholtz resonator" for more info.

As far as I understand, soundhole size has nothing to do with the scale length but is relative to the volume of air inside the box. I'm sure there are online calculators to give optimum sizes if you can work out the internal volume of your box. Theory suggests that size seems to affect the frequencies more than actual acoustic loudness - larger holes better treble but less bass. Some CBGers don't bother with holes at all and some put one in each corner. It seems that it doesn't make all that much difference what you do. I guess that's becuase the poor acoustic properties of a cigar box can't be altered enough to actually hear a big difference in audio quality. It's more a question of visual aesthetics where you place them.

My personal slant is usually to put one about an inch diameter in one corner. Sometimes two or three smaller ones. (I think the optimum worked out by someone was surprisingly small - only about 3/8 inch for the average size box). I built one with it in the centre but hid the neck by fitting a sink drain cover over it. Very little 'hole area' when you add it together but it sounds great and is one of my favourites. I also fit piezo pickups to all my guitars so if I want some volume and variety of tone I just run it through an amp.

I reinforce the box by simply running a bead of wood glue (PVA) around the inside of the corners. Some people use wooden beadings glued for extra strength. I think soundboard bracing would be overkill.

Theories seem to go right out the window with CBGs. Standard acoustic guitar builders consider the type and thickness of wood for the soundboard, type of internal bracing etc. Doesn't seem to make much difference to a cbg. Example I built one with a very thick lid. I thought it would sound dead but it has the best sustain of them all. In fact it's the thinner box lids that seem to be a little dead, I would have thought the opposite though perhaps they give more volume. A pal built one out of an all-cardboard box and it sounded great.

My advice would be not to get too caught up in all the technicalities or striving for the ulitmate sounding CBG. Just have fun, experiment, try a different approach each time you build one and see what works. You will be surprised what does. Every one I've built has sounded and felt different, some better than others but unless I use the exact same box and neck wood, I doubt I could repeat any one exactly but that's one of the things I like about it all - variety and the element of surprise. Don't get drawn into being too precious about them. It's a guitar made out of a cigar box after all! You're not competing with a Martin or a Gibson. Be guided by your imagination and whims and just enjoy the whole creative aspect.

Thursday, November 13, 2008

another UK cigar box guitar builder

This is one of the rewarding bonuses I get from doing this stuff. A few weeks ago I had an email from a guy named Rich. He'd seen the blog and felt inspired to build a CBG himself and asked for some advice. Here's an extract of his email -

'Just found your website after trawling the net to buy a cbg. Could only come up with Hawaiian type guitars then I found your blog - wow that blew me away......... then I discovered seasick steve and decided I needed a cbg in my life'

He had a good look at my older posts about building, and set to straight away. He kept me informed of his progress and has sent me these two pictures of his first CBG. What a great job he's done. Look at the neat construction work - he's an engineer. He ends by saying he just needs to learn to play it now.
Nice to know he's in the England too - another CBG nut to add to our growing UK tribe. Keep at it Rich and we look forward to seeing you play this baby on Youtube one day.

Sunday, November 02, 2008

two new CBGs on the way

I've been busy building again. I've got two new ones half finished. I'm developing the distressed theme I started with the last one. One box (Sun Dried) has a lacquer which tends to chip easily. So I capitalised on it and rubbed down the edges and corners to give it that nice 'worn in' look. It has a dark stained neck with a red headstock to echo the colour of the label which is scarlet red. It's looking great and it will be hard to let this one go too. The other box is a white paper covered Hoyo de Monterrey. It has green ends so I'm painting the neck green with a white fretboard. I'll rub it down to give it the worn in look too. I'll post photos later when they are done.

Update - they're done and I'm pretty damn pleased with the. Photos soon

Thursday, October 02, 2008

distressed cigar box guitar


Here it is, the latest creation - my artificially distressed CBG. It's tuned to open A. The volume is low when played acoustically but when amplified it's a little belter! I used the bowl part of an old spoon to make a jack socket plate.


Wednesday, September 24, 2008

smojo logo stamp

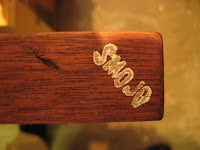
I've been trying to find a better way of adding my smojo logo to the headstocks. In the past I hand wrote it with a woodburning tool. Not easy to get it looking professional, not easy to control.

I'd been discussing it with my CBG buddy Mark and the idea of using some sort of stamp. So he has kindly made me a small rubber stamp, based on the new logo type I am using now. It's a little beauty. I tried it on my latest build using some white undercoat. I probably applied a little too much pressure and the paint bled out around the typeface - but I like it. Take a look.

Wednesday, March 05, 2008

cigar box guitar bridges saddles

As requested here's some info on bridges/saddles. First some principles as I understand them. The bridge/saddle is the main component that transfers the vibrations of the strings to the soundboard, in our case the cigar box lid. The most efficient materials are dense ones. Having said that the traditional material for acoustic guitars is bone which is not as dense as metal but I don't know why it is favoured. A CBG is never going to compete with a Martin or Gibson on sound quality but we do want to try to get a decent volume and tone out of it, given its limited capability, so it's worth experimenting with different types. Personally I like to use as much recycled material for my CBGs as possible. I have mainly just used scraps of hardwood like oak and mahogany and shaped them into an upside down "T" cross-section shape. I made one out of aluminium for the Quality Street tin and that worked well too. My last CBG had a bridge made from bamboo and aluminium and that also worked.

I think the positioning of the bridge on the soundboard must also have some bearing on the sound. I have seen many CBGs with the bridge placed right down at the bottom of the guitar. I haven't tried placing it there myself as logic tells me that the most sensitive area of the lid must be near the middle. I opted for a position about 2/3 down the lid which is roughly where most acoustic guitars have them. The guys that build them must know a thing or two so who am I to argue.

Another issue that may be of interest to the builder is how to secure the ball end of the strings as most modern acoustic guitars have the plastic pin arrangement in the bridge. Well most CBG builders adopt the "straight through neck" design. This lends itself to fairly easy construction and the facility to leave a short "tail" at the bottom of the box to anchor the strings to. Simply drill small holes to pass the strings through from underneath. I have included a small metal plate to take the strain of the strings off the wood, which would otherwsie tend to cut into it. Hope this helps.

Thursday, February 28, 2008

cigar box guitar building rules

I'm always looking for new angles on cigar box guitar building. I like to experiment, try new methods or materials in the hope of further improving the looks or playability and also for the fun of it. Sometimes they work - sometimes not. The last experiment was using classical guitar style machine heads requiring a slot to be cut out of the headstock. It resulted in me slicing a chunk out of my finger. Entirely my own stupid fault and I'm not sure it was worth it. I was hoping it would avoid the need for string trees giving me a steeper angle onto the tuner spindle from the nut. I found the angle was OK improving the pressure on the nut but due to the narrowness of the neck and straightness of headstock, there is a tendency for the outer strings to jump out of the threads of the bolts I use for nuts and therefor requiring some sort of string trees to guide the strings. My next experiment will be making nuts from aluminium bar with deeper slots to hold the strings more secure.

Another area for experiment is the bridge/saddle. So far I have tried using eye screws like many CBG builders but wasn't happy with the result. Most of my CBGs have saddles I make from hardwood like oak or mahogany, a sort of inverted T shape with shallow grooves for the strings. I was reading a posting on a forum about using banjo type saddles. They are narrow with feet at the ends which sit on the banjo skin and in fast look like the name suggests - a bridge. I got to the point on my latest build where I needed to make the saddle/bridge and rummaging through my scraps box, I found an odd thing which gave me inspiration. It was a broken slice of bamboo. Some time ago I bought some large diameter bamboo poles with the idea of making some percussion instruments. I had cut a slice off a piece but it had snapped in half forming a shape like half an onion ring. It struck me that the banjo type bridge could be made from a similar piece.
Using my bandsaw I cut a new slice about 6 mm wide then cut a piece about 1/3 of the diameter off it. I sliced a few mm off the outer curved edge to form a flat top. Then cut a narrow groove across that to hold a narrow aluminium saddle I made from some scrap. I think it looks and sounds good, I have fitted it to my latest CBG which you can see in another post.


My advice is, don't limit yourself to set ideas. By all means keep it in when when you find something that works well but try something new now and then, that's the fun of building these things, as someone said about CBG building "the rule is - there are no rules"

Friday, January 18, 2008

Intonation and saddle position on cigar box guitars

Intonation is the ability of the guitar to sound and play "in tune" at the correct fret positions and if it's wrong, a guitar won't play good at all. Not quite so critical on a fretless instrument as you play mainly "by ear" but you still want to get it right. Here's my method for setting the bridge/saddle position on my CBGs.

The neck will have already been marked out with the correct fret positions from a template which also includes the approximate position of the saddle. As you probably know, the 12th fret lies halfway between the nut and the saddle and gives you the first octave of the same note found on the open string. So that is the important position to get right.

I set the neck in the box to place the saddle about 1/3 from the tail. Don't know if that's the absolute best place for it but it seems right to me for aesthetic and playing purposes. When the neck is fixed and the lid fastened down, I string it up and place the saddle roughly where it should be. I keep the string tension low at this point so I can move the saddle easy. I use the shaft of a small screwdriver as a "slide" (easier to see the exact position over the frets due to it's narrow diameter). Next pluck a string open and either tune it to a set note with an electronic tuner or just listen to it if your pitch ear is good. Put the screwdriver slide over the 12th fret and pluck again. Is it the same note an octave higher exactly? If it is you were lucky and job done.

Assuming it's not spot on, keep plucking and move the slide up or down the string till you find the exact spot. Is it nearer or further from the saddle than the 12th fret position? If it's nearer the saddle (above the 12th) then move the saddle nearer to the nut thus shortening the nut-saddle distance until it's bang over the 12th. If the octave is below the 12th position then move the saddle nearer the tail of the guitar. Once you've got it in the right place you can either mark it's position, slacken the strings and glue it in place or just leave it unglued and tension up the strings to the pitch you want them. My preference now is not to glue because that gives me the option of fine tuning it in the future without ripping it off the box.

Monday, December 31, 2007

new project - cigar box guitar flight case

I've started it. It's shaped like a flight case and made from wood. It will hold two CBG's and have a battery powered amp built in. I'm pretty excited about it. The case is made from some old pitch pine boards that are painted a sort of grey/greeny blue colour and because it's old, it has gone crazy. That will form the edges of the case, sort of like a deep picture frame with a rebate along one side where a piece of plywood fits to form the main top and bottom of the case. It will have foam glued inside to form shapes for the guitars to lie in. I'm looking for some cheap velvet to cover the foam and make a nice inside. I'm putting some photos on here to show how it is progressing. Probably take a few weeks to finish. Keep dropping in here to see how it's going. First picture shows the bottom section from the outside. There will be a speaker for the amp mounted in it.

Second picture is a close-up of the nice old crazed paint. The actual colour is slightly greener than this.
Third picture is the inside of the bottom section with two guitars placed in to help work out the layout for the foam sponge.
Update 18th Jan - started fitting foam pieces around guitars and made some compartments for the amp, speaker and accessories. I put a wanted ad on Freecycle for some velvet to line it with and some kind lady dropped off two wine red curtains. It will look great when done. I had a suggestion from a CBG freind in the Netherlands to use the lid as a stompbox, so I'm going work on that plan too. Building this is on hold for a while. Three guitars have gone to new homes so I need to make a couple more now.


Wednesday, December 12, 2007

Cigar Box Guitar questions

I had a couple of questions asked about how to make a pick-up and anchoring strings. I thought it a good idea to post my answer on here too.

Q. - "I'm totally fascinated by the cigar box guitar and am trying to put one together right now. I think the first problem was how to get the strings/tail done, and I'm opting to just make very small holes and let the ball at the end hold things. The other problem is amplifying, a piezo has me stumped. I know Radio Shack has them and I've been told they simply wire over to an input jack ... but I was wondering if you have any suggestions as to how I can easily get the thing wired for amplification."

A. - The neck passes straight through the box and out the back about 5cm to provide anchorage for the ball end of the strings. I drill three holes about 1cm apart. I find that when strung, the strings start to cut into the wood so I make a small metal plate out of brass or alloy which I screw onto the tail just in front of the holes so that it takes the pressure of the strings off the wood and stops it cutting through. It helps keep the thing in tune as it stops you losing tension from them cutting into the wood.

Pickup - easy. It's a ceramic piezo transducer disc. Some people buy a piezo buzzer which has one in and they rip it apart. Hard work when you can just buy the disc anyway. It looks like a thin a brass disc with a white coating in the middle (like a fried egg). There are two wires soldered to it, one to the brass outer and one to the coating. Carfeully unsolder them and discard the wires. You need some screened twin cable and a 1/4 inch jack socket. On one end of the cable solder one wire to the inner of the jack and the other wire and the screen wire together to the outer. At the pickup end trim the outer covering back about 2 cm and cut off the screen. Very very carefully solder one wire to the brass and one to the coating where the old wires were. Be carfeul because the coating is fragile. If it breaks off when soldering just try soldering another small blob on another area, it usually works OK. Before fixing to the guitar, plug it into an amp and just tap the disc, if it clicks it's OK, if it's dead then you got it wrong. When OK I fix the socket into the body then glue the disc (brass side) with Araldite to the inside of the box just under where the bridge/saddle is going to be. I also add a blob of hot glue to stick the cable to the lid just to stop it flapping about and ripping your wires off. I don't bother with vol. or tone controls, just use those on the amp. Job done.

Wednesday, August 08, 2007

Making a Cigar Box Guitar - Part 4 - the bridge

There are different materials/items used for the bridge but it needs to be a hard material. Some people use a threaded eye hook. I tried it but wasn't happy. I make my own simple bridge using some hard wood like oak or mahogany - a small piece left from the neck will do. I make it about 5 cms long and shape the cross section into an upside down T shape. The saddle part where the strings cross is only about 3 or 4 mm wide. I make it using a small router bit mounted in a drill stand. I cut very shallow grooves (1 mm) about 1 cm apart for the strings to sit in.

I string it up temporary but not full tension and place the bridge in it's approx position. Pass the string through the bottom of the holes you drilled at the base of the neck. You need to find the exact spot for correct intonation. I use a tuner and play one string open and tune it to an exact note (e.g. A) The twelve fret should be exactly one octave higher. I use a screwdriver shaft as a slide for this process as the narrowness makes it more accurate. Place it over the 12th fret and move the bridge either further up or down the box until the octave is bang over the twelth. You can mark it's position if you intend glueing the bridge to the box. I don't usually bother as it gives me the option of fine tuning the intonation whenever I want.

The design of my necks means that there isn't quite enough backwards offset on the neck (like a Fender) to provide enough tension of the strings over the nut. Like Fender I get round this by fitting "string trees" which pull the strings down onto the nut. I sometimes use small screw eyes and thread the string through the eye. Sometimes I make a small metal bar with a hole at each end and two small screws through them into the headstock. The bar presses down on all three strings simultaneously. Once you have these fixed you can string it up and tune it.

These small refinements are something you can experiment with. Once you have the basic box, you'll find little ways of improving them. All part of the creative fun.

More refinement tips to come ......

Thursday, March 22, 2007

making a cigar box guitar part 3 - the box

So it's time for the box. It needs to be a wooden one not cardboard. I mainly use the paper covered ply boxes with hinged lids. I cut about a 1 inch (25mm) soundhole in the lid using a Forstner bit. The neck will fit just under the lid when closed so you need to cut notches in the ends for it to drop into. I open the lid and mark the centres of the two ends. Measure the section of the neck and mark this at these centres, allow a bit more depth for the thickness of the lid which usually sits inside the sides.

Carefully cut these pieces out using a coping saw or sharp craft knife. Aim for a close tight fit. The neck should fit into it now so try closing the lid - you might need to make it a bit deeper yet - the neck should protrude out the back a couple of inches (about 2 cm). There will be a gap under the neck between it and the bottom of the box. I make two pieces of narrow wood to fit tightly in this gap to support the neck and glue one at each end of the box. When set I drill through the back of the box and through these blocks. Next I put a wood screw with cup washer through each hole and and screw into the neck. Obviously choose screw lengths that won't come right through the neck. This secures the neck to the box.

If adding piezo pick-up I next drill a hole for the jack socket, glue the piezo disc to the underside of the lid where the bridge will be and wire it out. When happy with it close the lid and secure it with a few panel pins (usually there's one already in it in the middle - add another at each end)

coming next - the bridge, string trees and stringing it up. Any questions feel free to mail me.

Tuesday, March 06, 2007

making a cigar box guitar part 2 - the neck

This a brief description of how I make the necks. I use hardwood like oak or mahogany usually recovered from old furniture and ripped down to approx 20 x 30 mm section and about a metre long. I round off the corners slightly with a plane and rasp then sand down smooth.

I use another guitar neck to find the positions for nut, bridge and frets. I have made a template on thin MDF and use this to mark the positions in pencil allowing sufficient length for the headstock and for the neck to pass through the length of the cigar box and protrude about 50mm for attaching the ball end of the strings.

I mostly use 3 in a line tuners which means you need to remove some material from the front of the headstock to create an angle for the strings to drop down to over the nut (look at a Fender for the principle). I mark the positions of each tuner post and drill three holes for them to pass through.

I place the neck over the box so that the bridge will be about 1/3 up the length of the box and mark the neck about 10 mm inside where the box ends will be. This section which will be hidden in the box needs about 3mm removing - this is to stop the neck resting on the inside of the lid and dulling the sound.

I cut a small groove across the neck where the nut is to go and glue in a large threaded bolt for the actual nut.

I drill three small holes near the bottom end of the neck abou 10 mm apart for strings to pass through. The fret positions and dot markers are now burnt on using a woodburning tool (or old soldering iron). Also my signature "smojo" on the headstock. I "treat" the neck with a couple of thin coats of tung oil then rub smooth when dry with a cotton rag. Finally I attach the tuners.

This is just a rough guide, if you want any tips feel free to leave a comment or e-mail me.

Next part 3 - preparing the box